


A Guide To T Fillet Welding
Lesson 4: A Guide to T Fillet Welding
The most common type of welded joint you will encounter is known as a T-fillet weld. This type of joint crops up everywhere, because it is easy to design into a structure. If you want to be good at welding, the techniques involved in producing this joint in all materials and welding positions must be mastered.
This lesson will concentrate on welding a T-fillet joint in the horizontal and vertical welding positions (ISO 6947 PB) on low carbon steel up to 6mm thick.

Joint Preparation
How to :
Essentially, you need to weld metal that is not heavily rusted, covered in paint, grease or oil. The joint faces, where the metals meet, must be touching and not bent or twisted with large gapping. To remove paint and rust, use an angle grinder with a correctly mounted grinding wheel or sanding pad. Be gentle, as excessive grinding can leave deep grinding marks and reduce the metal thickness considerably.
When grinding, DO NOT forget to wear the correct PPE, namely eye protection correctly rated for a grinding application and some protective gloves. Having removed rust or paint, spend some time on ensuring that the edges of the parent materials meet, wherever possible try to avoid twisted or bent metals and ensure the two pieces touch.
It might be an idea to use degreasing agent to remove any remnants of oil or grease. It only takes seconds to wipe the joint faces with a degreaser. There are many safe degreasing agents available commercially to purchase. Try to avoid chemically based solutions and definitely do not use paint thinners. For advice, speak to Foster Industrial.
What do you need to start welding?
- - 2 x pieces of 6mm low carbon steel approximately 150mm x 50mm. Remove the mill scale using a sanding pad and angle grinder from the joint faces.
- - A G-clamp.
- - An engineer’s square.
- - A hammer
- - Your welding machine and PPE.
- - Diameter 1.0mm low carbon steel filler wire.
- - A shielding gas mixture of argon plus either oxygen or carbon dioxide.

Tack Welding
How to:
Welding generates huge amounts of heat. This heating and cooling has the effect of bending or twisting the joint during welding. This known as distortion. We cannot stop this from happening, but we can control and limit it’s effect.
The most common way, is to strategically place some small welds along the joint to hold the joint in alignment during the welding process. These are known as tack welds. It is normal to tack weld every welded joint you attempt. Note: The thinner your parent metal is the more tack welds you will need.
Set up and clamp the two pieces into a T shape.Tack weld the two ends of the T-joint. Tap the joint to 90˚ and check using the square that the angle is correct. Use the leftwards technique to weld the joint.
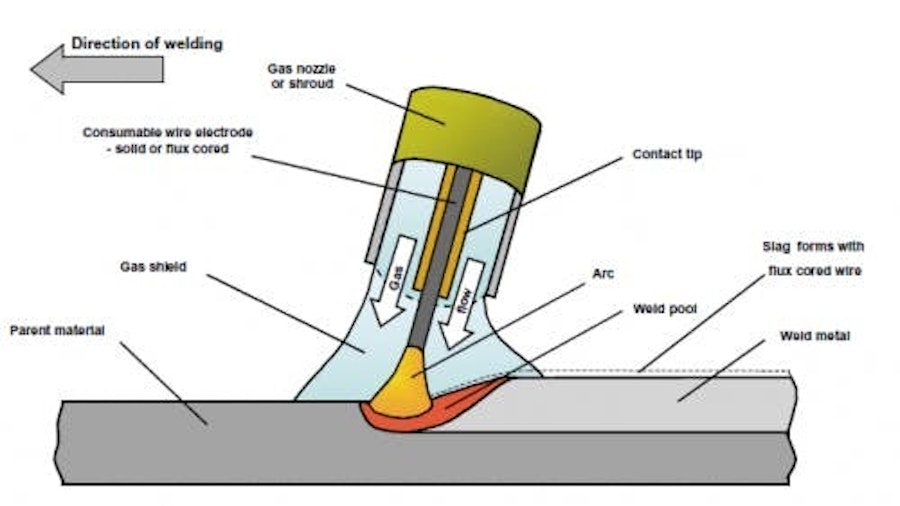
Look at the angle of the welding torch. This should be 70˚ to 80˚ and note the direction of travel. The leftwards technique means that the torch is pushed along the joint during welding or the gas pocket is always ahead of the welding wire. The direction of travel is right to left. For left handed people, the direction of travel will be left to right with the gas pocket also ahead of the welding wire.
How a good T-fillet weld must look
After welding use an angle grinder and sanding pad to remove localised spatter.
If you need to re-paint the welded area ensure that the joint and adjacent materials have cooled down completely.
Shop Welding


Shop Equipment


Learn & Resources


01509 509269


